The Idea
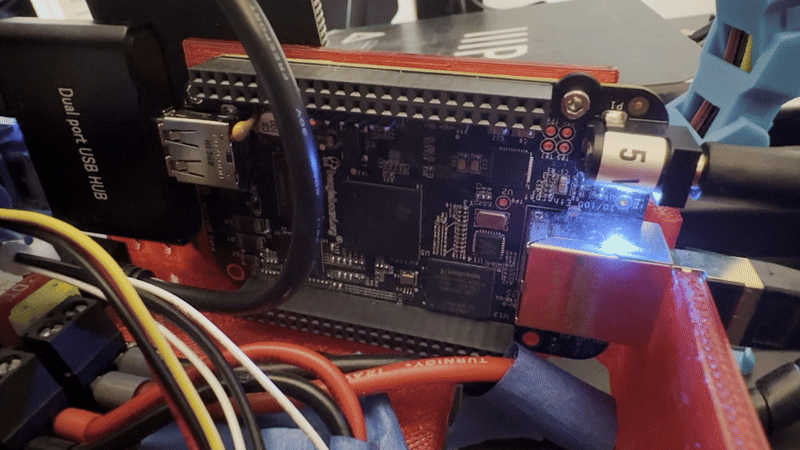
Over the course of a weekend I came up with the idea of loading OctoPrint onto my BeagleBone Black. The BeagleBone Black had been gathering dust in a drawer for some time, and I figured this would be the perfect project to utilize it.
So What is OctoPrint…? And What is the BeagleBone Black?
For those of you not in the know, OctoPrint allows remote monitoring and printing for a standard 3D printer. My favorite part about this is the remote camera integration it gives, allowing the user to view the 3D printer as it runs. This is clearly really powerful since it allows gathering more insight on your printer and helps with debugging remotely.
As for the BeagleBone Black, it is similar to the Raspberry PI, but slightly more optimized for GPIO and hardware usage. I bought it for a class, the same class that I made Frank for previously. I figured that since it could host Linux, it could be a prime use case of OctoPrint. After some quick Google searching, I found others that had tried and succeeded, so I figured I would give it a shot. Because some of these resources were not well compiled, I decided to write my own version that had updated links and could be a resource for others even.
On to the Details
I followed several guides, so I will be copying a lot of the materials I have found and referenced (with references). I am no Linux guru (although I hope to become one eventually!), so there may be some basic mistakes that I will endeavor to fix. This is also a reference for myself when I inevitably need to come back and figure out how I made it work last time… so, hello future me, sorry to see you! (Edit: Future me has already needed to use this! 😅)
Flashing the BeagleBone Black
My primary reference for a lot of what I will be describing can be found in this link, and I’ll be reformatting what they recommend for the most part. There were a few commands I had to tweak though like changing python to python3 due to support for my Debian version.
Go to here and search for the “BeagleBone Black” in the “Filter Software Distributions” text filter.
I chose and recommend the AM335x Debian 11.7 2023-08-05 4GB eMMC IoT Flasher. Downloading may take a few minutes, and I recommend checking the checksum (on Windows) with the following command (in your console of choice) from the folder it downloads to:
certutil -hashfile am335x-eMMC-flasher-debian-11.7-iot-armhf-2023-08-05-4gb.img.xz SHA256I then chose my favorite etching software balenaEtcher to flash it to an SD card plugged into my machine. This was done by selecting “flash from file” and navigating to the newly downloaded image. After this I selected “Flash!” and waited. This took about 3 minutes on my computer, but your milage may vary.
After this, plug it into the BeagleBone Black and hold the switch near the SD card until the LEDs turn off. In a moment, they will start a chasing pattern. This may take some time, but only took me about 10 minutes. Once the lights turn off, unplug the device and remove the SD card to make sure it boots off the 4Gb internal flash. You have now successfully flashed the BeagleBone Black!
Logging In
Now you can plug the BeagleBone Black back in and log into it via SSH. If you cannot connect, it may not have started up fully, so give it another minute. I have included a screenshot of my putty settings to make it easier for you to set this up.
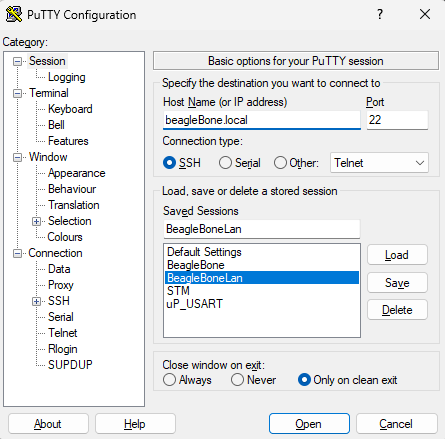
After setting your Host Name to beagleBone.local, post to 22, and set to SSH, you should be able to open a connection. Using your terminal of choice, you can also run the following command to do the same thing:
ssh debian@beaglebone.localIf you have used this device before, you may get an SSH error regarding a security breach. You can hit accept since this message is displayed erroneously (if and only if you have used the device before!). Plug in whatever the default username and password are (likely Debian and temppwd) and now you are in!
Security Hardening – Optional
Before connecting the device to the internet, we’ll perform basic security hardening. I started doing this after accidentally leaving devices exposed on a public IP for a year. My apartment’s ethernet turned out to have direct public IPs from the ISP — something I hadn’t checked, assuming it was behind the same router as the Wi-Fi. The ISP claims they do this to avoid router port and bandwidth limits from devices like Xboxes. Even though most of us are behind a router, we’ll still apply security measures, especially since I plan to port forward to this device eventually.
Changing the Default Password
The first and most obvious thing to do is to change the default password to something other than the default. In my case though, I will go a step further and also do public/private key encryption with my device. BIG NOTE! If you follow these steps and lose your public and private key, DO NOT BLAME ME! You will likely have to restart the entire process (one reason I am making this blog post!) and you will be very sad. For me, this is more convenient, and this method is also fundamentally more secure.
To change your password (document this, you will thank yourself later…) run the following commands on the BeagleBone and follow the prompts:
passwdChanging to Key Based Authentication
Once finished, we can generate your ssh key. To do this, run the following command on the machine you would like to have access to the server with, replacing ‘your_custom_key_name’ with whatever you want to signify the key with:
ssh-keygen -t rsa -b 4096 -f ~/.ssh/your_custom_key_nameThen enter your chosen passphrase (or not) for extra security.
Now you can check to see if it was generated correctly by navigating to ~/.ssh and checking that the file exists there.
Then we can copy it to the server with the following command where ‘your_custom_key_name’ is the name from above, ‘username’ is by default ‘debian’ or whatever you changed the username to, and ‘linux-machine-ip’ is ‘BeagleBone.local’:
ssh-copy-id -i ~/.ssh/your_custom_key_name.pub username@linux-machine-ipEnter your password and now it should be transferred! Before we change anything else, it would be prudent to double check that you can log in with ssh key encryption before disabling password login. You can check that this worked with the following command with the values you used above:
ssh -i ~/.ssh/your_custom_key_name username@linux-machine-ipYou will use this command for each time you want to log in now. To make it slightly easier, we can add the following to ~/.ssh/config with the values you used above, and then you can drop the ‘-i ~/.ssh/your_custom_key_name’ in future commands:
Host my-linux-machine
    HostName linux-machine-ip
    User username
    IdentityFile ~\.ssh\your_custom_key_name
Now, we can disable password authentication! To do this run:
sudo nano /etc/ssh/sshd_configIn this file, uncomment the line with ‘PasswordAuthentication yes’ and change it to ‘no.’ Once finished run:
sudo systemctl restart sshIf you’ve done everything correctly, you should now only be able to enter it via the key we just generated.
First Things First
Run the following command and press when prompted ‘Y’ to update the BeagleBone:
sudo apt-get update && sudo apt-get upgradeFor me this took about 20 minutes. Due to us changing the ssh settings, it complains and tries to change the file back to allowing password authentication. Select the option to keep the file we defined and we should be good!
Loading OctoPrint On to the BeagleBone Black
Press ‘Y’ when prompted
sudo apt-get update
sudo apt-get install python3-pip python3-virtualenv
mkdir ~/OctoPrint
virtualenv ~/OctoPrint/venv
source ~/OctoPrint/venv/bin/activate
pip install --upgrade pip
pip install --upgrade setuptools
pip install --upgrade distribute
pip install OctoPrint
After finishing this process, run:
octoprint serveand then navigate from another computer (after a few minutes) to whatever the ip is on port 5000, for instance ‘http://192.168.7.2:5000/’
If everything has gone successfully, then the wizard for setting up OctoPrint should pop up in your browser. Step through the wizard setting up access control (username and password), allowing Connectivity check, configuring privacy settings, enabling blacklist processing, skipping the classic webcam wizard (to revisit later), setting the 3D printer settings, and adding the following server commands:
Restart OctoPrint: sudo service octoprint restart

Restart system: sudo shutdown -r now

Shutdown system: sudo shutdown -h now
These will not work immediately, because we will have to make a small change to allow OctoPrint access to these. That will be handled later though. For now, click next, accept the agreements, and then hit finish! We now have OctoPrint running!
Currently we still have to manually start OctoPrint on boot though (undesirable), so what we will do is set up a daemon to start it on boot.
To do this, I used the final comments recommendation, copied here for safe keeping. Close out the server (ctrlC) and run the following commands and copy the following text:
sudo nano /etc/systemd/system/octoprint.serviceThen copy the following text into it:
[Unit]
Description=Octoprint Server
After=network.target
[Service]
Type=simple
Restart=always
RestartSec=10
User=debian
ExecStart=/home/debian/OctoPrint/venv/bin/octoprint serve --port=5000
[Install]
WantedBy=multi-user.target
Then save it and issue the following command
sudo systemctl enable octoprint.serviceWe also need to give it the required Once you restart the device with ‘sudo reboot’ and wait a few minutes, you should be able to log in like before to verify it worked.
Configuring the OctoPrint Camera
This will be identical to the solution posted under “Optional Webcam” under the official setup guide. I will be copying the needed sections here for reference, but all the effort for these steps goes towards the OctoPrint team for their excellent writeup. With that predicated, run the recommended commands from that article. These should work on Debian 11 (Bullseye) which I recommended you use above.
cd ~
sudo apt install subversion libjpeg62-turbo-dev imagemagick ffmpeg libv4l-dev cmake
git clone https://github.com/jacksonliam/mjpg-streamer.git
cd mjpg-streamer/mjpg-streamer-experimental
export LD_LIBRARY_PATH=.
make
After running all of these, we will be VERY tight on space on the internal flash… but we are still within it! Running the following command (and making sure the camera is plugged in!) will allow the video streamer to start working.
./mjpg_streamer -i "./input_uvc.so" -o "./output_http.so"If this doesn’t work, and the following command does:
./mjpg_streamer -i "./input_uvc.so -y" -o "./output_http.so"Then I would highly recommend using another webcam. Unfortunately, if your camera requires this second command, it will require more CPU. The BeagleBone may be capable of running this and streaming commands to the printer, but I do not want to risk that and recommend you do as well.
To test if this is truly working, we can open up a browser and type in:
http://beaglebone.local:8080/?action=streamIf you’ve followed the steps correctly, you should see your camera streaming to your browser. Given that this works, navigate to your OctoPrint server. In the settings, navigate to ‘Classic Webcam’ and enter in the following:
Stream URL: http://beaglebone.local:8080/?action=stream
Snapshot URL: http://127.0.0.1:8080/?action=snapshot
Then switch to ‘Webcam & Timelapse’ to set the following option:
Path to FFMPEG: /usr/bin/ffmpegAutomatic Camera Start Up
To get mjpg-streamer to automatically startup on boot, we need to set up another Daemon. To do this, run the following command:
mkdir /home/debian/scripts
nano /home/debian/scripts/webcamDaemon
Then add the following text (modified from the same OctoPrint setup guide):
#!/bin/bash

MJPGSTREAMER_HOME=/home/debian/mjpg-streamer/mjpg-streamer-experimental
MJPGSTREAMER_INPUT_USB="input_uvc.so"

# init configuration
camera="auto"
camera_usb_options="-r 640x480 -f 10"

# runs MJPG Streamer, using the provided input plugin + configuration
function runMjpgStreamer {
    input=$1
    pushd $MJPGSTREAMER_HOME
    echo Running ./mjpg_streamer -o "output_http.so -w ./www" -i "$input"
    LD_LIBRARY_PATH=. ./mjpg_streamer -o "output_http.so -w ./www" -i "$input"
    popd
}

# starts up the USB webcam
function startUsb {
    logger "Starting USB webcam"
    runMjpgStreamer "$MJPGSTREAMER_INPUT_USB $camera_usb_options"
}

# we need this to prevent the later calls to vcgencmd from blocking
# I have no idea why, but that's how it is...
vcgencmd version

# echo configuration
echo camera: $camera
echo usb options: $camera_usb_options

# keep mjpg streamer running if some camera is attached
while true; do
    if [ -e "/dev/video0" ] && { [ "$camera" = "auto" ] || [ "$camera" = "usb" ] ; }; then
        startUsb
    fi

    sleep 120
done
Once written to the file, run the following command to make sure it is executable:
chmod +x /home/pi/scripts/webcamDaemonOnce finished, we need to add this to systemctl. We can do this with the following steps:
sudo nano /etc/systemd/system/webcamd.serviceAnd add the following text to the file:
[Unit]
Description=Camera streamer for OctoPrint
After=network-online.target OctoPrint.service
Wants=network-online.target

[Service]
Type=simple
User=debian
ExecStart=/home/debian/scripts/webcamDaemon

[Install]
WantedBy=multi-user.target
Exit and then run:
sudo systemctl daemon-reload
sudo systemctl enable webcamd
Now, we can test if this works by restarting the device with ‘sudo reboot’ and seeing if OctoPrint streaming works when the server comes back up!
Once you have this working, to allow starting/stopping the camera from the OctoPrint server, run the following command:
nano ~/.octoprint/config.yamland add the following text to the file:
system:
  actions:
   - action: streamon
     command: sudo systemctl start webcamd
     confirm: false
     name: Start video stream
   - action: streamoff
     command: sudo systemctl stop webcamd
     confirm: false
     name: Stop video stream
   - action: restartwebcam
     command: sudo service webcamd restart
     name: Restart Webcam
Setting Up Sudoers.d
Before any of the following is need, make sure you have system restart and shutdown enabled. These were enabled above by going to the UI, under Settings > Commands. You may have realized that these commands offered through OctoPrint may not work. This is due to OctoPrint not having Sudo access. Confirm if it works before trying the following (it will work if you have passwordless Sudo access allowed). What we will do is allow Sudoless access to the relevant commands only. To do this, create the following files and contents via these commands:
sudo nano /etc/sudoers.d/octoprint-shutdownThen copy this, modifying the USERNAME to be your user:
USERNAME ALL=NOPASSWD: /sbin/shutdownAlso copy the following to allow OctoPrint to restart your camera and itself
sudo nano /etc/sudoers.d/octoprint-serviceThen paste this in, modifying the USERNAME to be your user:
USERNAME ALL=NOPASSWD: /usr/sbin/serviceSetting up the Printer to Communicate to OctoPrint
When I first connected my printer, it complained that several host commands were not available due to my current Marlin build. After some sleuthing, I discovered that several commands needed to be enabled in my Marlin build for full OctoPrint functionality. As I had built my 3D printer firmware myself some time ago, I was able to recall that project (and its settings!) and adjust them as needed, updating everything mentioned in this post. I initially had issues with my ram overflowing into my stack, but it turned out my TFT screen options were misconfigured, resulting in about half of my ram and flash being taken up by garbage. This was amended via the following issue I found for my TFT screen (the BTT_TFT35_SPI_V1_0).
Setting Up the SD Card
If you run ‘df,’ you will realize that there is VERY little space left on the primary drive. Fortunately, we don’t have to use this drive for anything else! Because there is an SD slot, we can put all our gcode and logs into it, allowing easy transfer from device to device even. This will be a basic tutorial on how to reformat an SD slot, mount it automatically on boot, and setting up OctoPrint to actually save files in it. I followed this tutorial mostly, subbing out components as needed for the BeagleBone. To start, first run the following command and validate that there is an SD card detected
sudo fdisk -lYou may have to set the format for the mount command. If not you can skip the first command, otherwise replace ***SD NAME*** with your SD name.
sudo mkfs.ext4 /dev/***SD NAME***
sudo mkdir /mnt/SD
sudo mount /dev/***SD NAME*** /mnt/SD
sudo chown -R debian /mnt/SD (If using a non-windows SD partition)
I then created all the following directories:
mkdir /mnt/SD/Octoprint/
mkdir /mnt/SD/Octoprint/uploads
mkdir /mnt/SD/Octoprint/timelapse
mkdir /mnt/SD/Octoprint/watched
Then updated those inside OctoPrint:
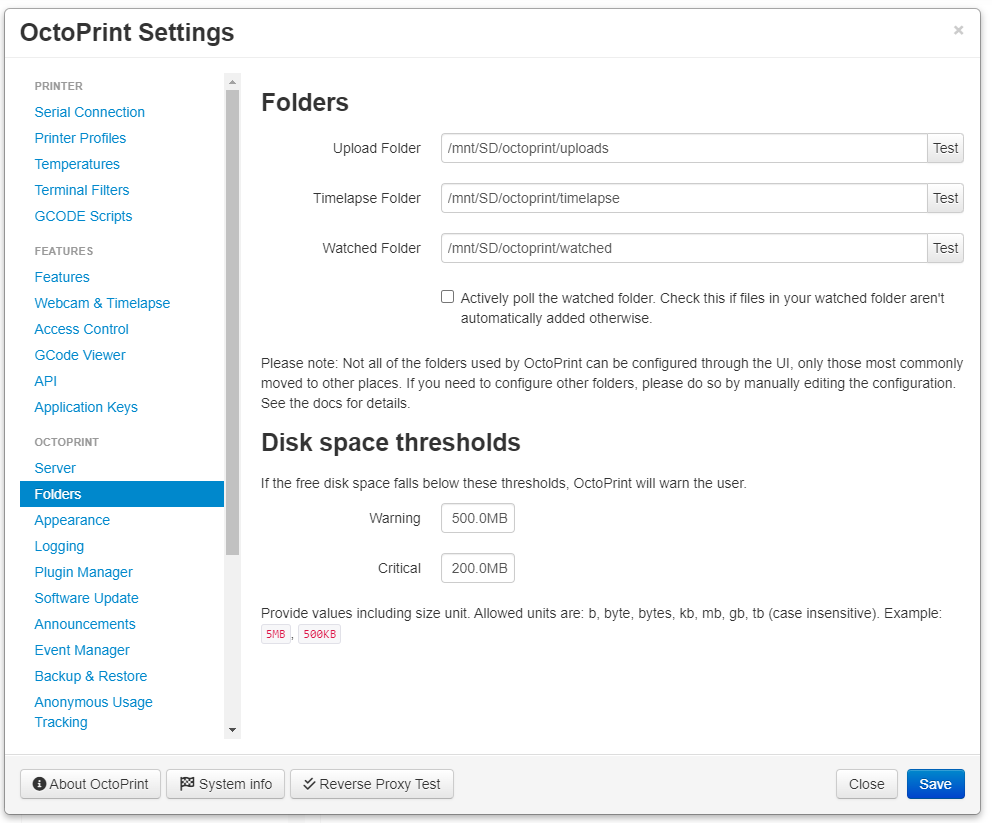
Make sure to hit test for each of those to make sure your new folders are working as expected.
Now The Dangerous Part…
Lastly, I wanted to make sure that it would stay mounted after a reboot. This involved adding an fstab entry by doing the following:
sudo nano /etc/fstabThen add this to the last line. Keep in mind, if you screw this up, your device could get stuck in a boot loop. You can recover this by booting in from one of the non-EEMC flashing sd card images available on the site I linked to above. This allows you to edit the entry from the other device until you fix this. I am speaking from experience, this sucks (I made a small typo my first time…).
/dev/mmcblk0p1 /mnt/SD ext4 rw,user,noexec,nofail 0 0This adds the mount on boot with no execution privilege (since this is just a storage device for gcodes, this is perfectly fine). Reboot, and it should have not become unmounted!
Remote Access to OctoPrint – Optional (Requires Security Hardening from Above)
I imagine that one of the main reasons you wanted OctoPrint in the first place was to monitor your prints and printer remotely from outside your home network. This has some obvious risk associated with it, but who wouldn’t want to be able to do this! Anyways, make sure to have done the Security Hardening steps from before. Without them, one of the thousands of SSH connection requests may find their way into your machine with a camera to see you and access to a heater that could (with some unsafe firmware) burn your house down. I don’t mean to catastrophize (I doubt any of us are government targets), but it is important to do what you can (especially when it is easy) to make your printer safer and to avoid it becoming part of the botnet.
Freeing Space
After all this work, I was about 97% full, so I start deleting things. The following stack overflow post was a good reference.
In addition to this, I found the following command useful:
sudo du -ks /usr/share/* | sort -nIn addition to this I removed Vim from my system because it was taking up a lot of space and I am fine with nano for the few tasks I need it for. I also found a few things that I guess came with the BeagleBone that I removed. Also, because we are finished building, we can get rid of the compiler chains.
sudo apt purge vim vim-common vim-runtime cmake-data nginx-common
sudo apt purge pocketsphinx-en-us
sudo apt autoremove
Remote Access (Port Forwarding, But Slightly Safer)
I have configured my router to forward SSH connections to the BeagleBone. There are plenty of online guides that explain how to set up SSH port forwarding for your specific router, so I won’t cover those details here. Since we’ll be running the server on port 5000, we can use an SSH tunnel to securely route traffic to that port and access OctoPrint from anywhere, provided you have access to a console. If you’ve set up your server and router this way, you can connect with:
ssh -L 5000:127.0.0.1:5000 user@remote.host
Where remote.host is your server’s IP address, user is your OctoPrint device’s username. If you have followed all the instructions above, it will ask for your ssh password, which you should enter to connect. This will have to be run every time you want to connect to the device.
To make the BeagleBone accessible over the LAN, I configured the Ethernet interface to use a static IP. I generally followed this tutorial, but instead of editing the main network configuration file, I placed the settings in a separate file under interfaces.d.
I DO NOT RECOMMEND port-forwarding port 5000 directly. This is because OctoPrint, despite it having a login screen, is not safe to expose to the world. Would you let someone access your plastic melting machine and fire starter to anyone? This is why SSH is my recommended method to safely access the printer. Breaking a public/private key encryption is impossible when using modern keys.
OctoPrint Plugins
Now would be an appropriate time to download plugins. Here are the ones I downloaded, but make sure to review each and make sure they work for your printer configuration:
- Arc-Welder
- Bed Visualizer
- Classic Webcam
- Custom Control Manager
- File Check
- Firmware Check
- MeatPack
- Preheat Button
- PrintTimeGenius Plugin
- Printer Dialogs
- Printer Notifications
- Slicer Thumbnails
- Virtual Printer
Several of these are bundled with OctoPrint when you download it. For individual setup instructions, look at the plugin pages to learn more.
Making A Backup
I have been perpetually unlucky throughout this process, so I figured I should make a backup of my EMMC to another device now that it was all configured. I did this by running the following commands after plugging in a fresh microSD card. Make sure you do not have any printer files stored on it before you do this. You may need to set the format for the card for this to work correctly.
sudo cp -v /etc/beagle-flasher/beaglebone-black-emmc-to-microsd /etc/default/beagle-flasher
sudo beagle-flasher
I then stored this in a ziplock back and put it inside my 3D printer case. Then documented where I put it… via this blog.